Mastering Amulet Titan: The Side Guide That Took Me to the Pro Tour

Introduction
Hey, I'm Cristian Rodriguez, but you might know me as CrisMTG77 on MTGO. I've been playing Amulet Titan on MTGO for quite some time now, racking up multiple 5-0 finishes and solid results in the Challenges. Plus, it's the deck I used to qualify for the Pro Tour in Ghent!
In this article, I will attempt to cover all the key matchups in the current Modern meta, along with my best tips and tricks for each of them.
Deck Overview
This is the deck I piloted at the LEC in Ghent, which qualified me for the Pro Tour, is extensively tested, with each card fulfilling a specific role.
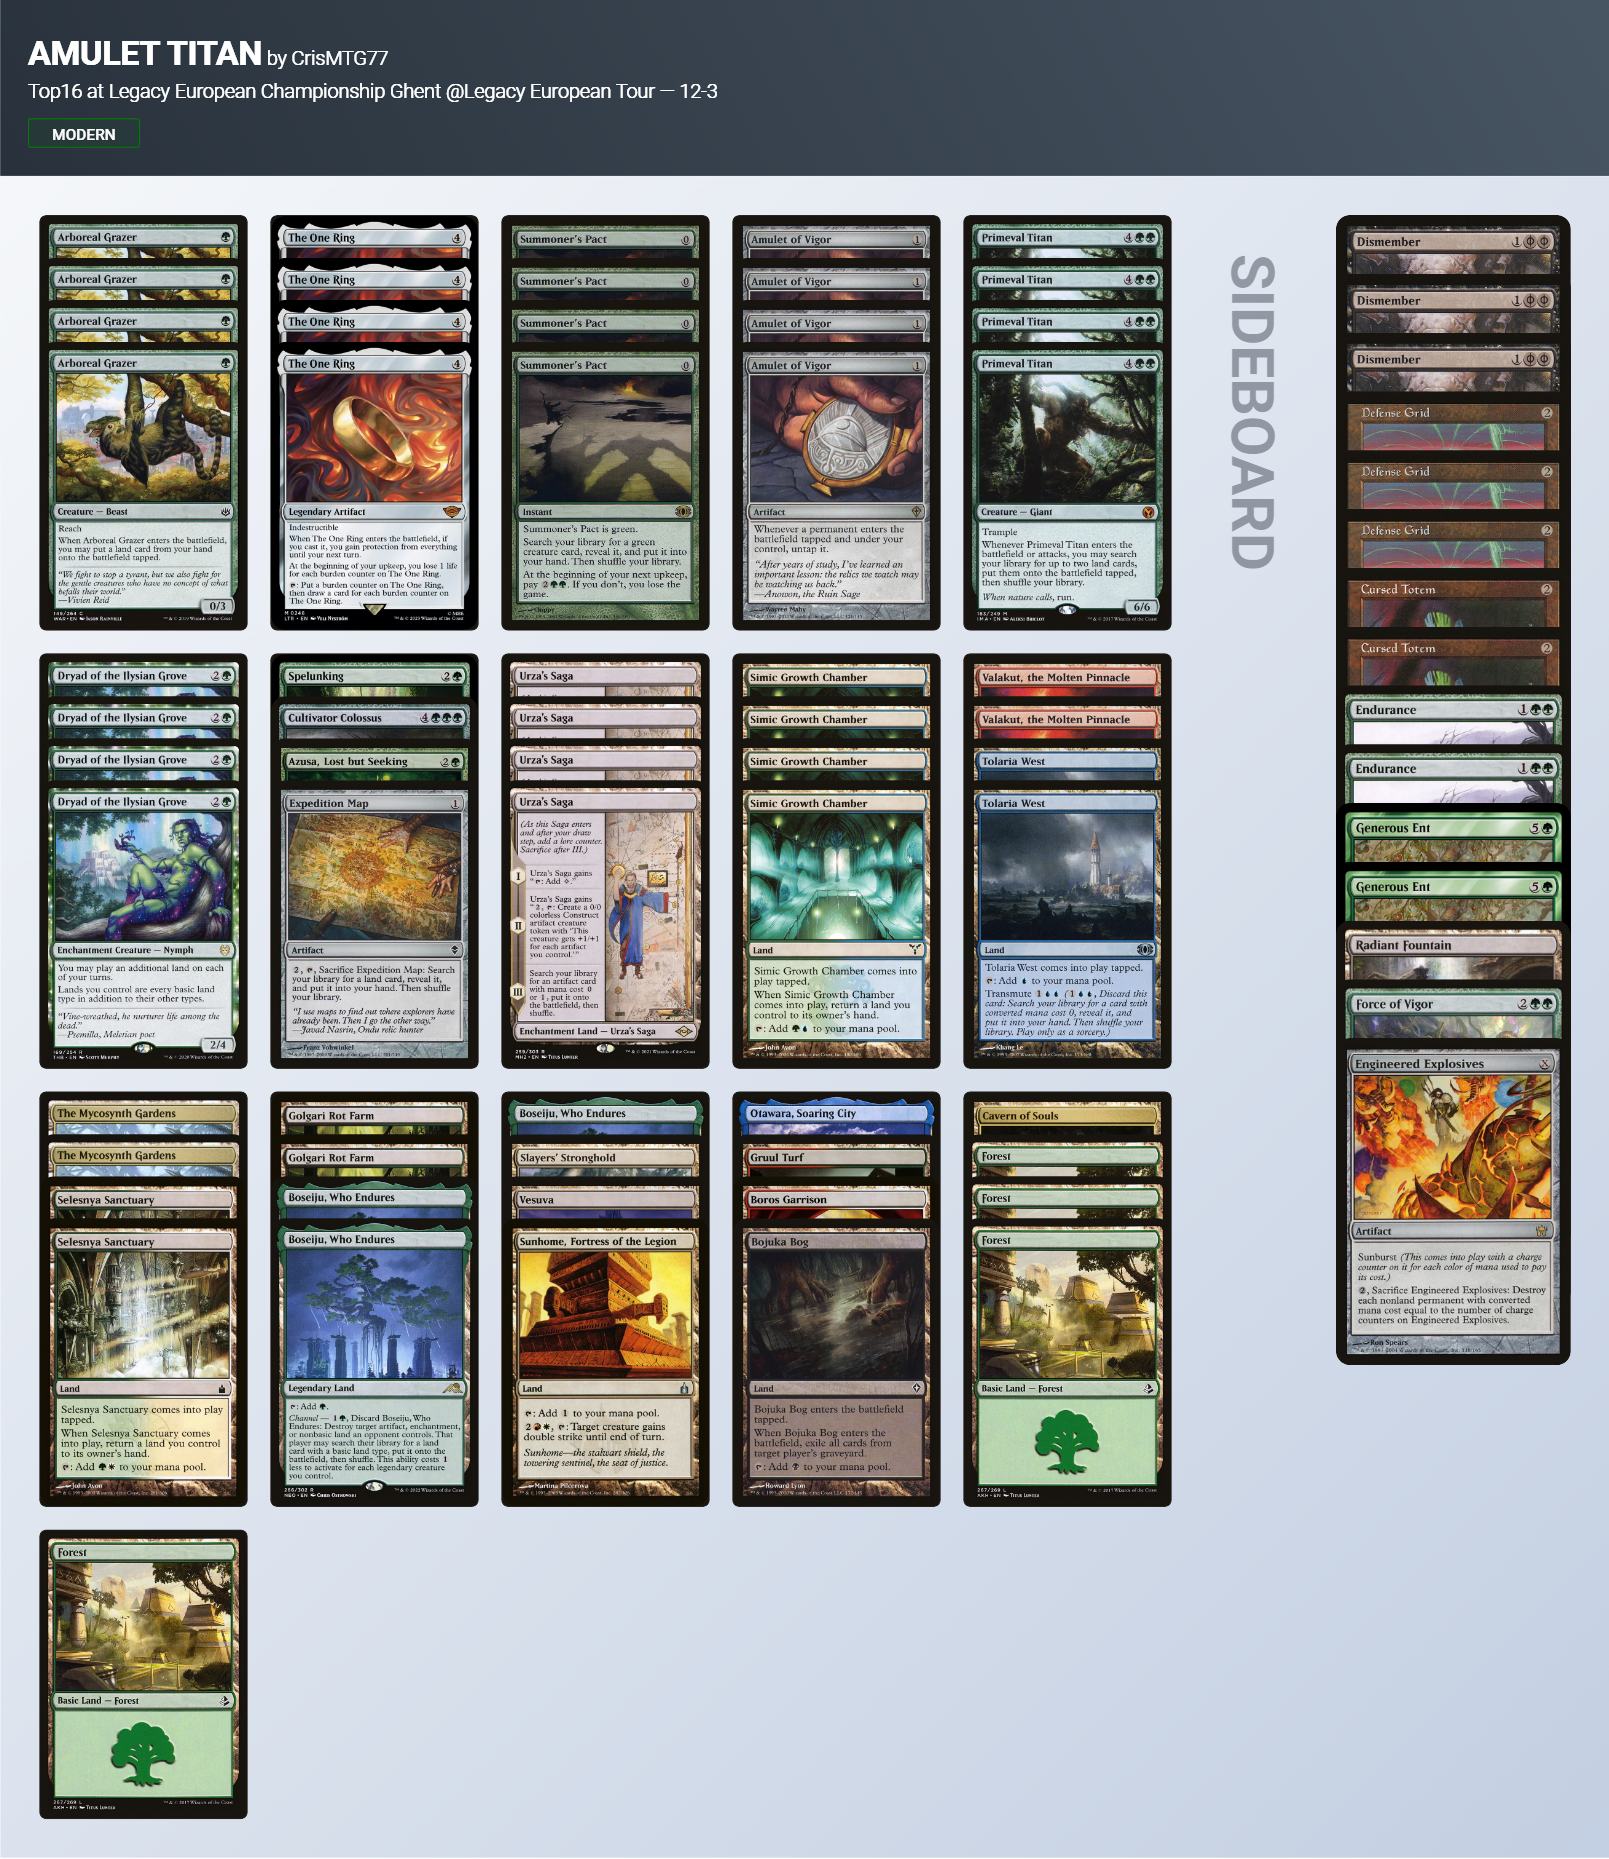
(12 - 3)
80% in Legacy European Championship Ghent @Legacy European Tour [948 Players] — 27-Jan-2024
| Creature [14] | ||
|---|---|---|
| 4 Arboreal Grazer | $0.35 | |
| 1 Azusa, Lost but Seeking | $6.49 | |
| 1 Cultivator Colossus | $14.99 | |
| 4 Dryad of the Ilysian Grove | $12.99 | |
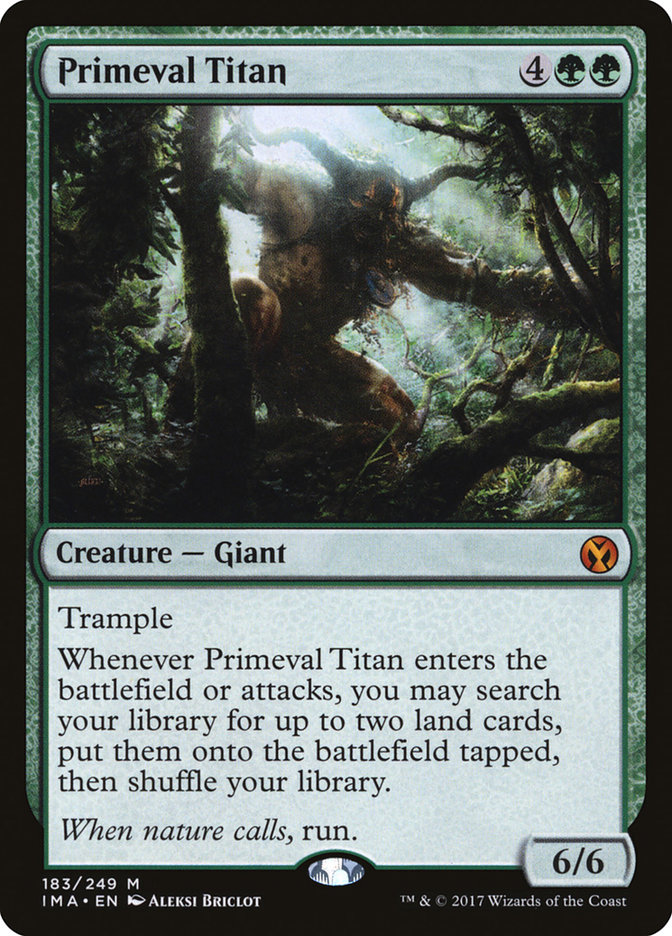
| 4 Primeval Titan | $4.99 | |
| Artifact [9] | ||
|---|---|---|
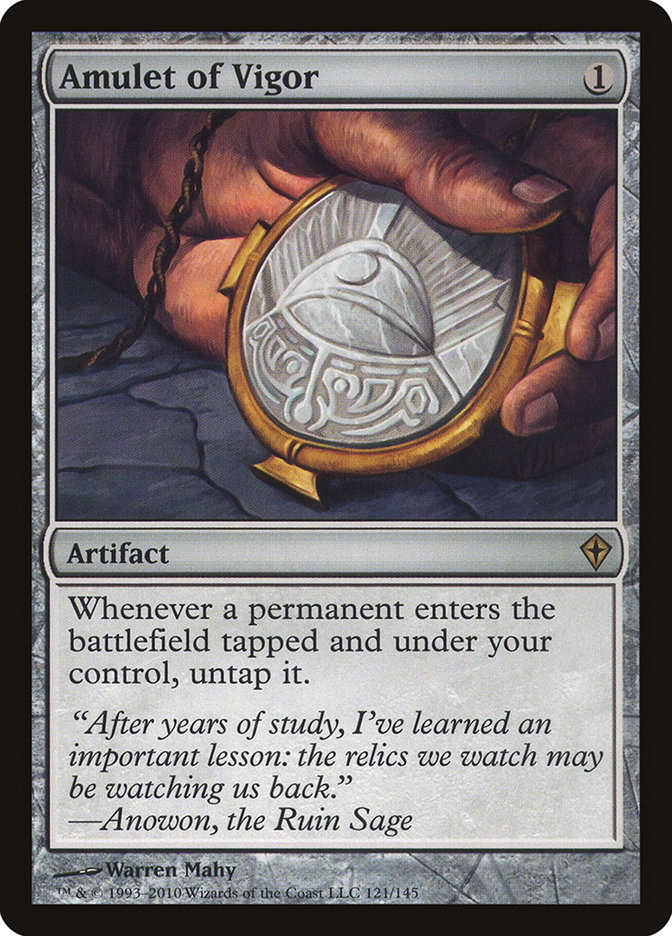
| 4 Amulet of Vigor | $21.99 | |
| 1 Expedition Map | $2.99 | |
| 4 The One Ring | $79.99 | |
| Instant [4] | ||
|---|---|---|
| 4 Summoner's Pact | $4.99 | |
| Enchantment [5] | ||
|---|---|---|
| 1 Spelunking | $2.49 | |
| 4 Urza's Saga | $39.99 | |
| Land [29] | ||
|---|---|---|
| 1 Bojuka Bog | $1.79 | |
| 1 Boros Garrison | $0.35 | |
| 3 Boseiju, Who Endures | $49.99 | |
| 1 Cavern of Souls | $42.99 | |
| 4 Forest | $0.01 | |
| 2 Golgari Rot Farm | $0.39 | |
| 1 Gruul Turf | $0.39 | |
| 1 Otawara, Soaring City | $24.99 | |
| 2 Selesnya Sanctuary | $0.35 | |
| 4 Simic Growth Chamber | $0.35 | |
| 1 Slayers' Stronghold | $0.49 | |
| 1 Sunhome, Fortress of the Legion | $0.35 | |
| 2 The Mycosynth Gardens | $4.99 | |
| 2 Tolaria West | $1.49 | |
| 2 Valakut, the Molten Pinnacle | $23.99 | |
| 1 Vesuva | $15.99 | |
| Sideboard [15] | ||
|---|---|---|
| 2 Cursed Totem | $2.79 | |
| 3 Defense Grid | $3.49 | |
| 3 Dismember | $5.99 | |
| 2 Endurance | $27.99 | |
| 1 Engineered Explosives | $12.99 | |
| 1 Force of Vigor | $10.99 | |
| 2 Generous Ent | $0.79 | |
| 1 Radiant Fountain | $0.49 | |
 $341.54 Tix @cardhoarder
$8.54 / Week @cardhoarder
$341.54 Tix @cardhoarder
$8.54 / Week @cardhoarder
 $899.33 @tcgplayer
 $1,105.34 @cardkingdom
The deck typically consists of approximately 31 to 33 lands and centers around exploiting Amulet of Vigor. Its ability to untap permanents that enter the battlefield tapped forms the core of the deck, which can be exploited by correctly arranging the triggers on the stack. The effect is cumulative, so multiple Amulets lead to additional untapping triggers with each bounce land played. Combine this with multiple mana ramp spells and four copies of Primeval Titan, and you have the core of the deck.
Updating the Deck with Karlov Manor
With the release of Karlov Manor, I've been testing out Worldsoul's Rage, swapping it into some of the flex slots.
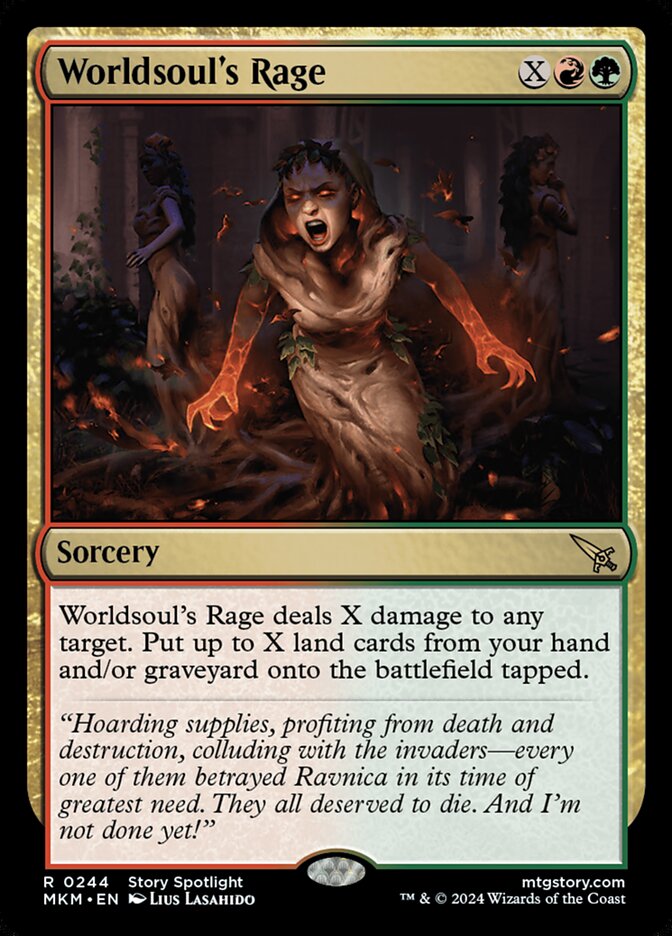
Here are the two decklists with which I've also recently achieved solid results. As they have a very similar sideboard to the one I used in Ghent, you can follow the same guide while playing these updated versions.
Updated versions with MKM:
https://mtgdecks.net/Modern/amulet-titan-decklist-by-crismtg77-1910481
https://mtgdecks.net/Modern/amulet-titan-decklist-by-crismtg77-1910117
You can watch me play them on YouTube at the end of the article!
Key Components and Strategy
Primeval Titan
The deck's namesake, it is a 6/6 for 6 mana that fetches two tapped lands upon entering the battlefield or attacking. This enables you to search for cards such as Slayer's Stronghold and Boros Garrison, which can give the Titan haste, a +2/+0 boost, and vigilance, allowing it to attack on the same turn it enters and fetching additional lands.
This effect becomes even more powerful when we have two or more Amulets. We can increase the power further to +4+0 using Slayer's Stronghold, and during combat, search for Sunhome, Fortress of the Legion and Vesuva, with Vesuva copying Boros Garrison (or any other bounce land when Dryad of the Ilysian Grove is in play), enabling us to grant double strike to Primeval Titan for a devastating finish.
Valakut
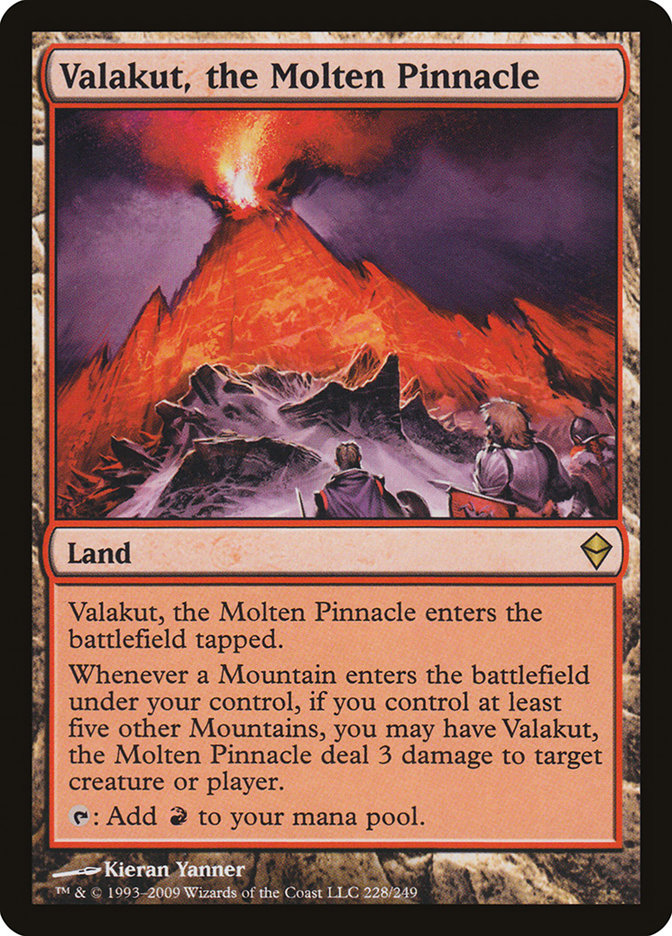
Another well-known strategy is to finish the game with Valakut with the help of Dryad of the Ilysian Grove and Primeval Titan. Dryad provides an extra land drop each turn and makes all your lands every type, which interacts perfectly with Valakut. We usually include two copies of Valakut in the deck. This often allows you to curve your hand to play a land and an Amulet on turn 1, followed by a bounce land on turn 2, which you leave on the battlefield, cast Dryad, and play an additional land (resulting in 3 mana available for the next turn from 2 lands on the battlefield). On turn 3, play another bounce land (which you can also leave on the battlefield), then cast Primeval Titan, searching for Valakut and Slayer's Stronghold. Keeping track of mana, you will have one extra, which could be the land left from the previous turn. Convert this and the Valakut to white/red mana, giving the Titan +2+0, haste, and vigilance. When attacking, search for another Valakut and Vesuva, copying the existing Valakut on the battlefield (remember that Vesuva cannot copy the land it enters with). This will trigger all three Valakuts, causing 18 damage to go on the stack (also remember that Valakut triggers from the fifth land onward), dealing 3 damage for each Valakut in play. This is one of the deck's many lines and one of the simplest and cleanest ways to achieve lethal damage.
Cultivator Colossus
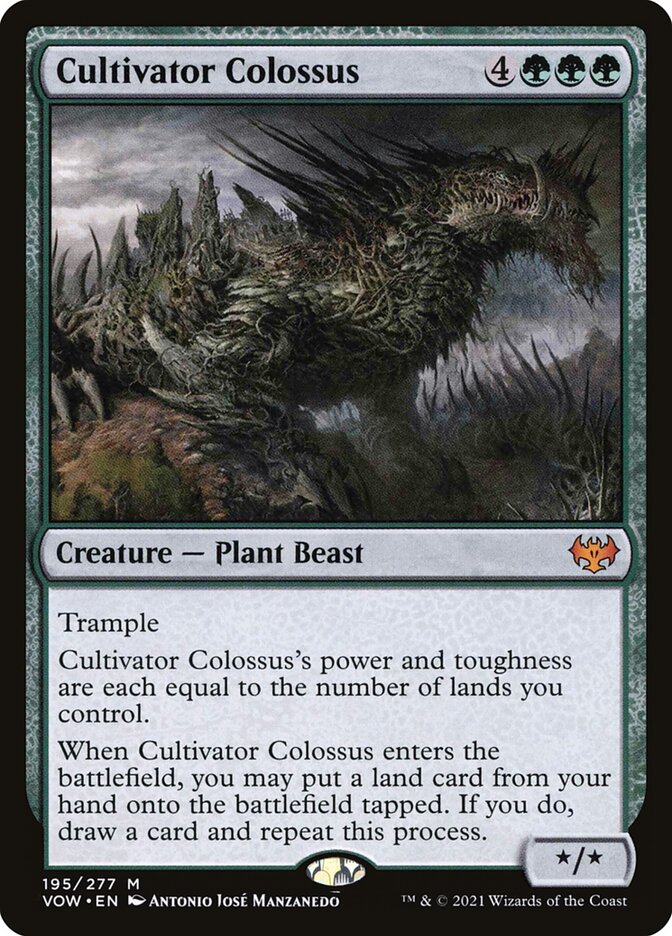
Lastly, we need to discuss Cultivator Colossus, a creature of which we include a single copy in the deck. It's primarily used in situations where a Titan is not enough, or when we need to find a specific non-land card from the deck. The Colossus's enter-the-battlefield trigger allows us to put a land from our hand onto the battlefield “tapped” and draw a card.
We can repeat this process until we run out of cards in hand. Considering that half of the deck consists of lands, this often results in accumulating a large amount of mana. It allows us to exchange all our lands in hand for non-land cards or, in other words, valuable cards (such as Primeval Titan, Dryad, Amulets, Grazers, Summoner's Pacts, etc.).
Up to this point, I have provided a brief introduction on how to play the deck, its main strategies, and victory conditions. However, when it comes down to it, the deck has nearly infinite lines of play and a very extensive list of tricks. We will discuss many of them in the sideboard guide, but if you think we should publish an in-depth article with all the tricks, let us know in the comments to make it happen!
Without further ado, let's move on to the important part, the SIDE guide.
Matchup & Sideboard Guide
Rakdos Scam
This is considered one of the worse matchups for Amulet Titan. However, after the banning of Fury, the only opening that can really cause us problems is the classic turn 1 Grief scam, breaking our hand and applying pressure from the first turn. Ragavan often gets shut down by Arboreal Grazer or a turn 2 drop like Dryad, Azusa, or a Saga token if we have an Amulet on the field. One of the scams' trump cards is the Moon effects, against which we carry many tools to find our basic lands (4 Forest main, 2 Generous Gift side) besides many tools also to remove Blood Moon from our way. Against Magus of the Moon, we have 3 Dismember side and Otawara main. Even so, do not hesitate to use Dismember on a possible early threat (Ragavan, Dauthi, Grief) because you are perfectly able to stabilize the board even with Magus of the Moon in play, with Amulets, Dryads, Grazers, Ents, Titans, etc.
On the play
On the play, it's about blowing your opponent away with a swift or smoothly established hand (Grazer, Dryad, possible threat turn 3,4) because often the game tends to get stuck with several Amulets on the table, our opponent putting a bit of pressure on us having discarded the threat and us waiting to draw one of the many bombs we carry to win the game.

On the draw:
On the draw, this matchup gets a bit complicated, however, the key is to always keep, whenever possible, some type of quick response. Dismember becomes very valuable on these occasions, and naturally, Grazer as well, and above all, having some basic lands to keep up is beneficial. In this position, we need something to interact with the Ragavan, because it often leads to Fable/Dauthi and a discard/moon effect on turn 2, which can put us in a tight spot.

Key Cards
The One Ring is a card that gains incredible value in this matchup. Drawing it from the top can happen quite frequently now that Scam can't apply pressure as drastically as it could with Fury, so the game may last longer.
Dauthi & Discard
It's also important to be cautious when Dauthi and discard come together to steal a Ring or a Titan, but you also have a trick up your sleeve with Otawara, an extremely valuable land in this pairing that we can use to return stolen permanents with Dauthi to our hand, or very often to return Griefs scammed back to our opponent's hand and end the pressure they are exerting.
Blood Moon & Magus
Don't forget that basic lands are not affected by Blood Moon/Magus, so even though Dryad of the Ilysian Grove entered before the Moon and it can't add mana of any color from non-basic lands, you can generate mana of any color from the basic lands; it doesn't matter the rule of which entered first, a very useful trick for transmuting, using Otawara, or even filtering mana for a Dismember.
Temur Rhinos

Another unfavorable matchup, tempo will matter greatly, and it will be crucial to intuit our opponent's future actions. It's also important to be familiar with current deck lists as well as knowing when to bait Force of Negations, Tishanas and Subtleties. In this matchup, we'll generally feel uncomfortable due to the deck's great access to zero-cost spells. It can slow you down a turn using Fire/Ice and curve into a turn 3 with a Violent Outburst to cast Rhinos while still being available to cast Force of Negation or Subtlety. Generally, game 1 can be perfectly won either with an aggressive combo hand—always without risking dying to our own Summoner's Pact unless it's necessary as a last resort—, or with an early Ring or Primeval Titan. The advantage in this game is that they usually struggle when there is a Titan/Generous Ent on the board, as they can hold off the Rhinos.
Managing your Resources
You will often have to engage in a war of attrition, utilizing Force of Negation and Force of Virtue while striving to prolong the game. Always aim to ensure that your primary spell remains unaffected, or attempt to circumvent their counters with your sideboarded Defense Grids.
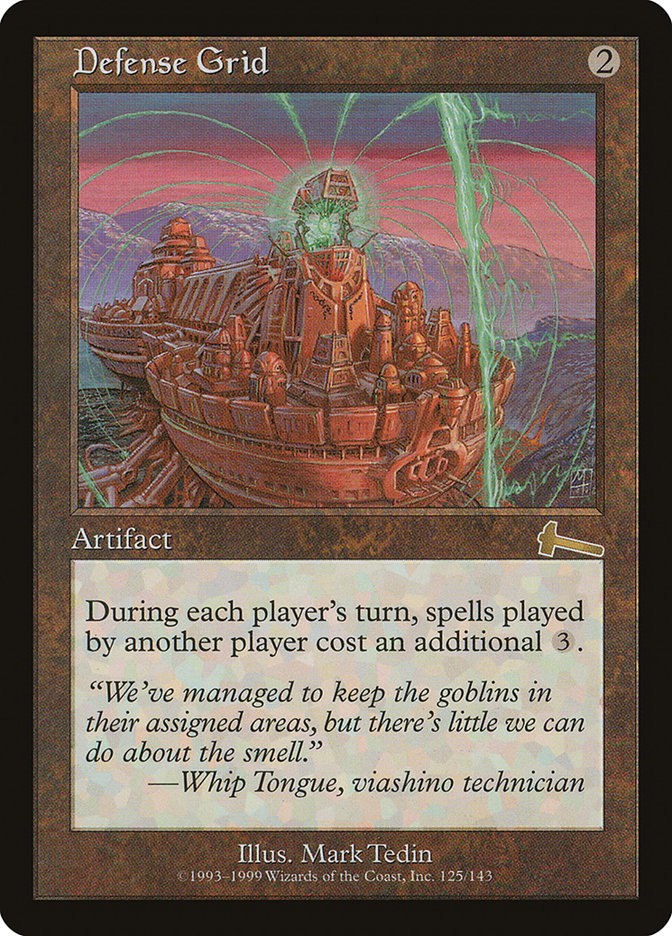
Defense Grid tends to be a very effective strategy against zero-cost spells and will allow you to play with ease on your turn. Make sure to utilize resources like Tolaria West and Otawara effectively, not only to search for a Summoner's Pact or to bounce a Ring, but also to find a Boseiju or Engineered Explosives when necessary, and to return a Rhino token to your opponent's hand to alleviate pressure.
Muktide

In this matchup, card advantage and knowing how to play your cards correctly are very important. Being able to get a Ring into play is essential if we can, even if we have to sacrifice a Defense Grid in the process. It is usually a good play to cast Endurance during their upkeep to force them to tap out if we suspect, based on how they manage their graveyard, that a Murktide is coming. Otherwise, we can cast it during their end step or before declaring blockers, preferably if there's a Dragon's Rage Channeler with delirium or a Ragavan trying to deal damage.
Early Game
In this matchup, it's crucial to have something in hand to stop your opponent in the early turns, whether that's Dismember or Arboreal Grazer. However, we can't allow Ragavan to connect in the early turns because our opponent will then be able to play a game that is both proactive and reactive simultaneously, making it very difficult for us to come back.
Don't worry about the counters
If you have several threats, don't be afraid to cast them—always do so wisely, trying to avoid Spell Pierce or Subtlety. However, if it's not possible and you have several valuable cards, the best option is to cast them until one gets through. This will help you keep up with the tempo, and your opponent, now without initial pressure, will have to remain untapped until disruption comes their way. If you only have one valuable card, try to hold it in your hand until you see a small window to play it. If that's not possible, try to cast it under the best conditions you can, such as avoiding Spell Pierce if it's a Ring, or casting Titan or Generous Ent when your opponent has fewer than four untapped mana to prevent Subtlety from staying on the board.
Tap Out
If possible, always cast Endurance without using evoke, as it will pose a threat that your opponent will have to deal with, and it won't require the cost of an additional green card from your hand. Don't be afraid to tap out, or to keep hands that can't defend against a Blood Moon effect. You have four forests and many ways to search for them, in addition to being able to develop your board through the Ring and basic lands. Blood Moon is not a significant problem.
Winning the Game
You win the game as soon as you can stop your opponents by bouncing Bojuka and stabilizing the board, or if you manage to resolve a value card like The One Ring or Primeval Titan. Lastly, a small piece of advice: you can return a Murktide to the hand with an Otawara, so it's not a problem as long as you keep this in mind. Additionally, you can return a Magus of the Moon to the hand if you can filter mana with a Dryad and a basic land.
Yawgmoth

What can I say about this matchup? I believe it's the worst pairing we could currently have in the metagame, perhaps on par with Living End. However, in this case, everything worsens after sideboarding. Game 1 will be based on being faster than them, so generally, keeping a hand that is somewhat balanced—with a quick kill or table stability in the early turns—is usually sufficient.
After sideboarding, everything becomes more complicated because our opponent has tools such as Force of Vigor, Fulminator Mage, Reclamation Sage, and Haywire Mite to prevent us from advancing our game plan. That's one of the reasons to keep the four Rings after sideboarding, as the game tends to last longer, during which our opponent will most likely retain hate cards to prevent us from developing our strategy. Therefore, it's not as necessary to rush; instead, we should be prepared to respond to these types of hands.
Two Key Cards
Every hand we open that contains Dismember or Cursed Totem is highly valuable for the keep, as it enables us to interact with our opponent by removing Yawgmoth or Hapatra from play, or effectively paralyzing the board with Cursed Totem. If possible, protect Cursed Totem with Mycosynth Lattice, or try to avoid having additional artifacts or enchantments on the board, as this will increase the value of their Force of Vigor.
Dismember should always be directed at Hapatra or Yawgmoth, unless we observe that our opponent is constrained by mana, or if there is an alternative threat that necessitates its use sooner, such as Sheoldred, for instance.
Boseiju
Try to keep Boseiju in hand, if possible, to disrupt Agatha's Soul Cauldron. This will be crucial against synergies such as Fulminator + Cauldron, which could cause us to automatically lose the match. Always destroy it in response to the creature's exile ability (as soon as it targets) so that we don't risk the card being exiled from the graveyard, allowing them to play an Orc in response, take advantage of the token, or search for it with a Chord of Calling.
Focus on the Value
To play this matchup correctly post-sideboard, we must forget about tempo and focus on the value that the previously mentioned cards gain when deciding whether to keep a hand. This doesn't mean that a hand with a good curve isn't keepable, or that one with several amulets isn't either. Rather, it means we should not worry about tempo if we've kept a hand with Cursed Totem and Dismember, for example.
Endurance
The single copy of Endurance is there to protect us against combinations such as Cauldron and Fulminator Mage, to keep Grist below 5 loyalty counters, or to prevent a crucial Wolf from returning to your opponent's side.
PS: The Endurance also blocks well as a surprise in combat.
Mirror Match

In the mirror match, we will need to learn from the Yawgmoth matchup and also accurately assess hands that contain answers such as Boseiju or Force of Vigor.
Game 1 will be based on either being faster than your opponent or slowing them down by using Boseiju. It will mainly target the Bounceland of the turn, or, if we notice that won't be sufficient, we can disrupt key lands they are searching for, such as Slayer's Stronghold, Tolaria West, or even one of their own Boseijus.
Interacting with Our Opponent
It is very important to correctly detect your opponent's intentions in this matchup because there will be plays that involve revealing information from their hand. Such plays include leaving a Bounceland on the table early, determining whether they search for an Expedition Map or an Amulet with Urza's Saga, and deciding whether to create a token with it, among others. Here, it is vital that our Boseiju targets the correct land when cast unless it is going to target a Dryad or Amulets.
Similarly, Dismember is brought in from the sideboard because it allows you to interact with your opponent, whether it's making them miss lethal with a Titan under the effects of Slayer's Stronghold and Sunhome, or to eliminate a Dryad or Azusa.
The best card in this matchup is undoubtedly Force of Vigor, so we will have to play around it. If necessary, we should delay playing the Amulet from our hand until our Saga triggers, or place high value on an opening hand that contains this card.
Colossus Explaned
Finally, to explain the reason for removing Colossus: most of the time, having a resolved Titan and searching for a bounce land plus Boseiju will be sufficient to win the match. On many occasions, playing a Colossus is unviable because we might have lost Amulets along the way, or we may have had to ramp in the usual manner using lands from our hand, rendering the Colossus non-threatening. Furthermore, in the mirror match, a difference of even one mana can be decisive, in this case, from 6 to 7.
Living End
This matchup, along with BG Yawgmoth, is one of the worst we can encounter in the metagame. It easily interacts with us and has a dangerous third turn where it is likely to resolve a Living End with Violent Outburst or Shardless Agent and win the game. It possesses a full repertoire of spells that cost little to play, including Rhinos and Grief, which control our hand. Upon resolving Living End, these spells return in the form of additional discard effects.

Game One
Game 1 is very complicated, especially if we are unaware that we are playing against Living End. Our only interaction is Bojuka Bog, and furthermore, it is a matchup where the hand we choose to keep differs significantly from the usual. Similarly to when playing against Yawgmoth, we must attempt to keep a hand that contains an answer to disrupt their strategy.
The Discard Trick
Another fairly common strategy is to discard a Titan or Colossus. How? On the draw, we can play a land on turn 1 and then use a bounce land on turn 2. This way, we haven't missed a land drop, and we would end up with 8 cards in hand, allowing us to discard at the end of the turn.
This approach also applies to situations where you feel you don't have an answer and must forgo a land drop. From experience, it is better to discard a Titan or Colossus to prolong the game rather than allowing our opponent to resolve a turn 3 Living End and steamroll over us.
Post-Sideboard
After sideboarding, there are many tricks available, such as discarding Elementals to compel the opponent to postpone their Living End, or casting Endurance while an Amulet is on the battlefield. This interaction causes Subtlety to put Endurance on top of the library, allowing us to cast it once more.
Defense Grid is a standout card in this matchup; it allows us to clearly telegraph our plays while also complicating our opponent's actions during our turn. This means we can play with a bit more ease. We can cast Endurance during our turn, preventing our opponent from responding, or we can simply advance toward securing the win.
I would say that the main objective is to make the game difficult for them so that they can't pull off a big Living End on turn 3. From there, if we can start chaining together Rings, our chances of winning increase, as do our responses. Additionally, we can make use of the Green Pact without the risk of losing during upkeep, whether it's to search for Endurance or Generous Gift. In conclusion, the longer we manage to prolong the game, the higher our chances of securing victory.
Extra Chapter: Gameplay
For those of you interested in the performance of the updated version featuring Murders at Karlov Manor, I've got a link for you to see it in action.
Conclusion
In this guide, I have endeavored to thoroughly cover and explain the six main decks of the meta, including strategies and how to play each deck beforehand.
With nothing more to add, I bid you farewell.
May you have prosperous land drops!